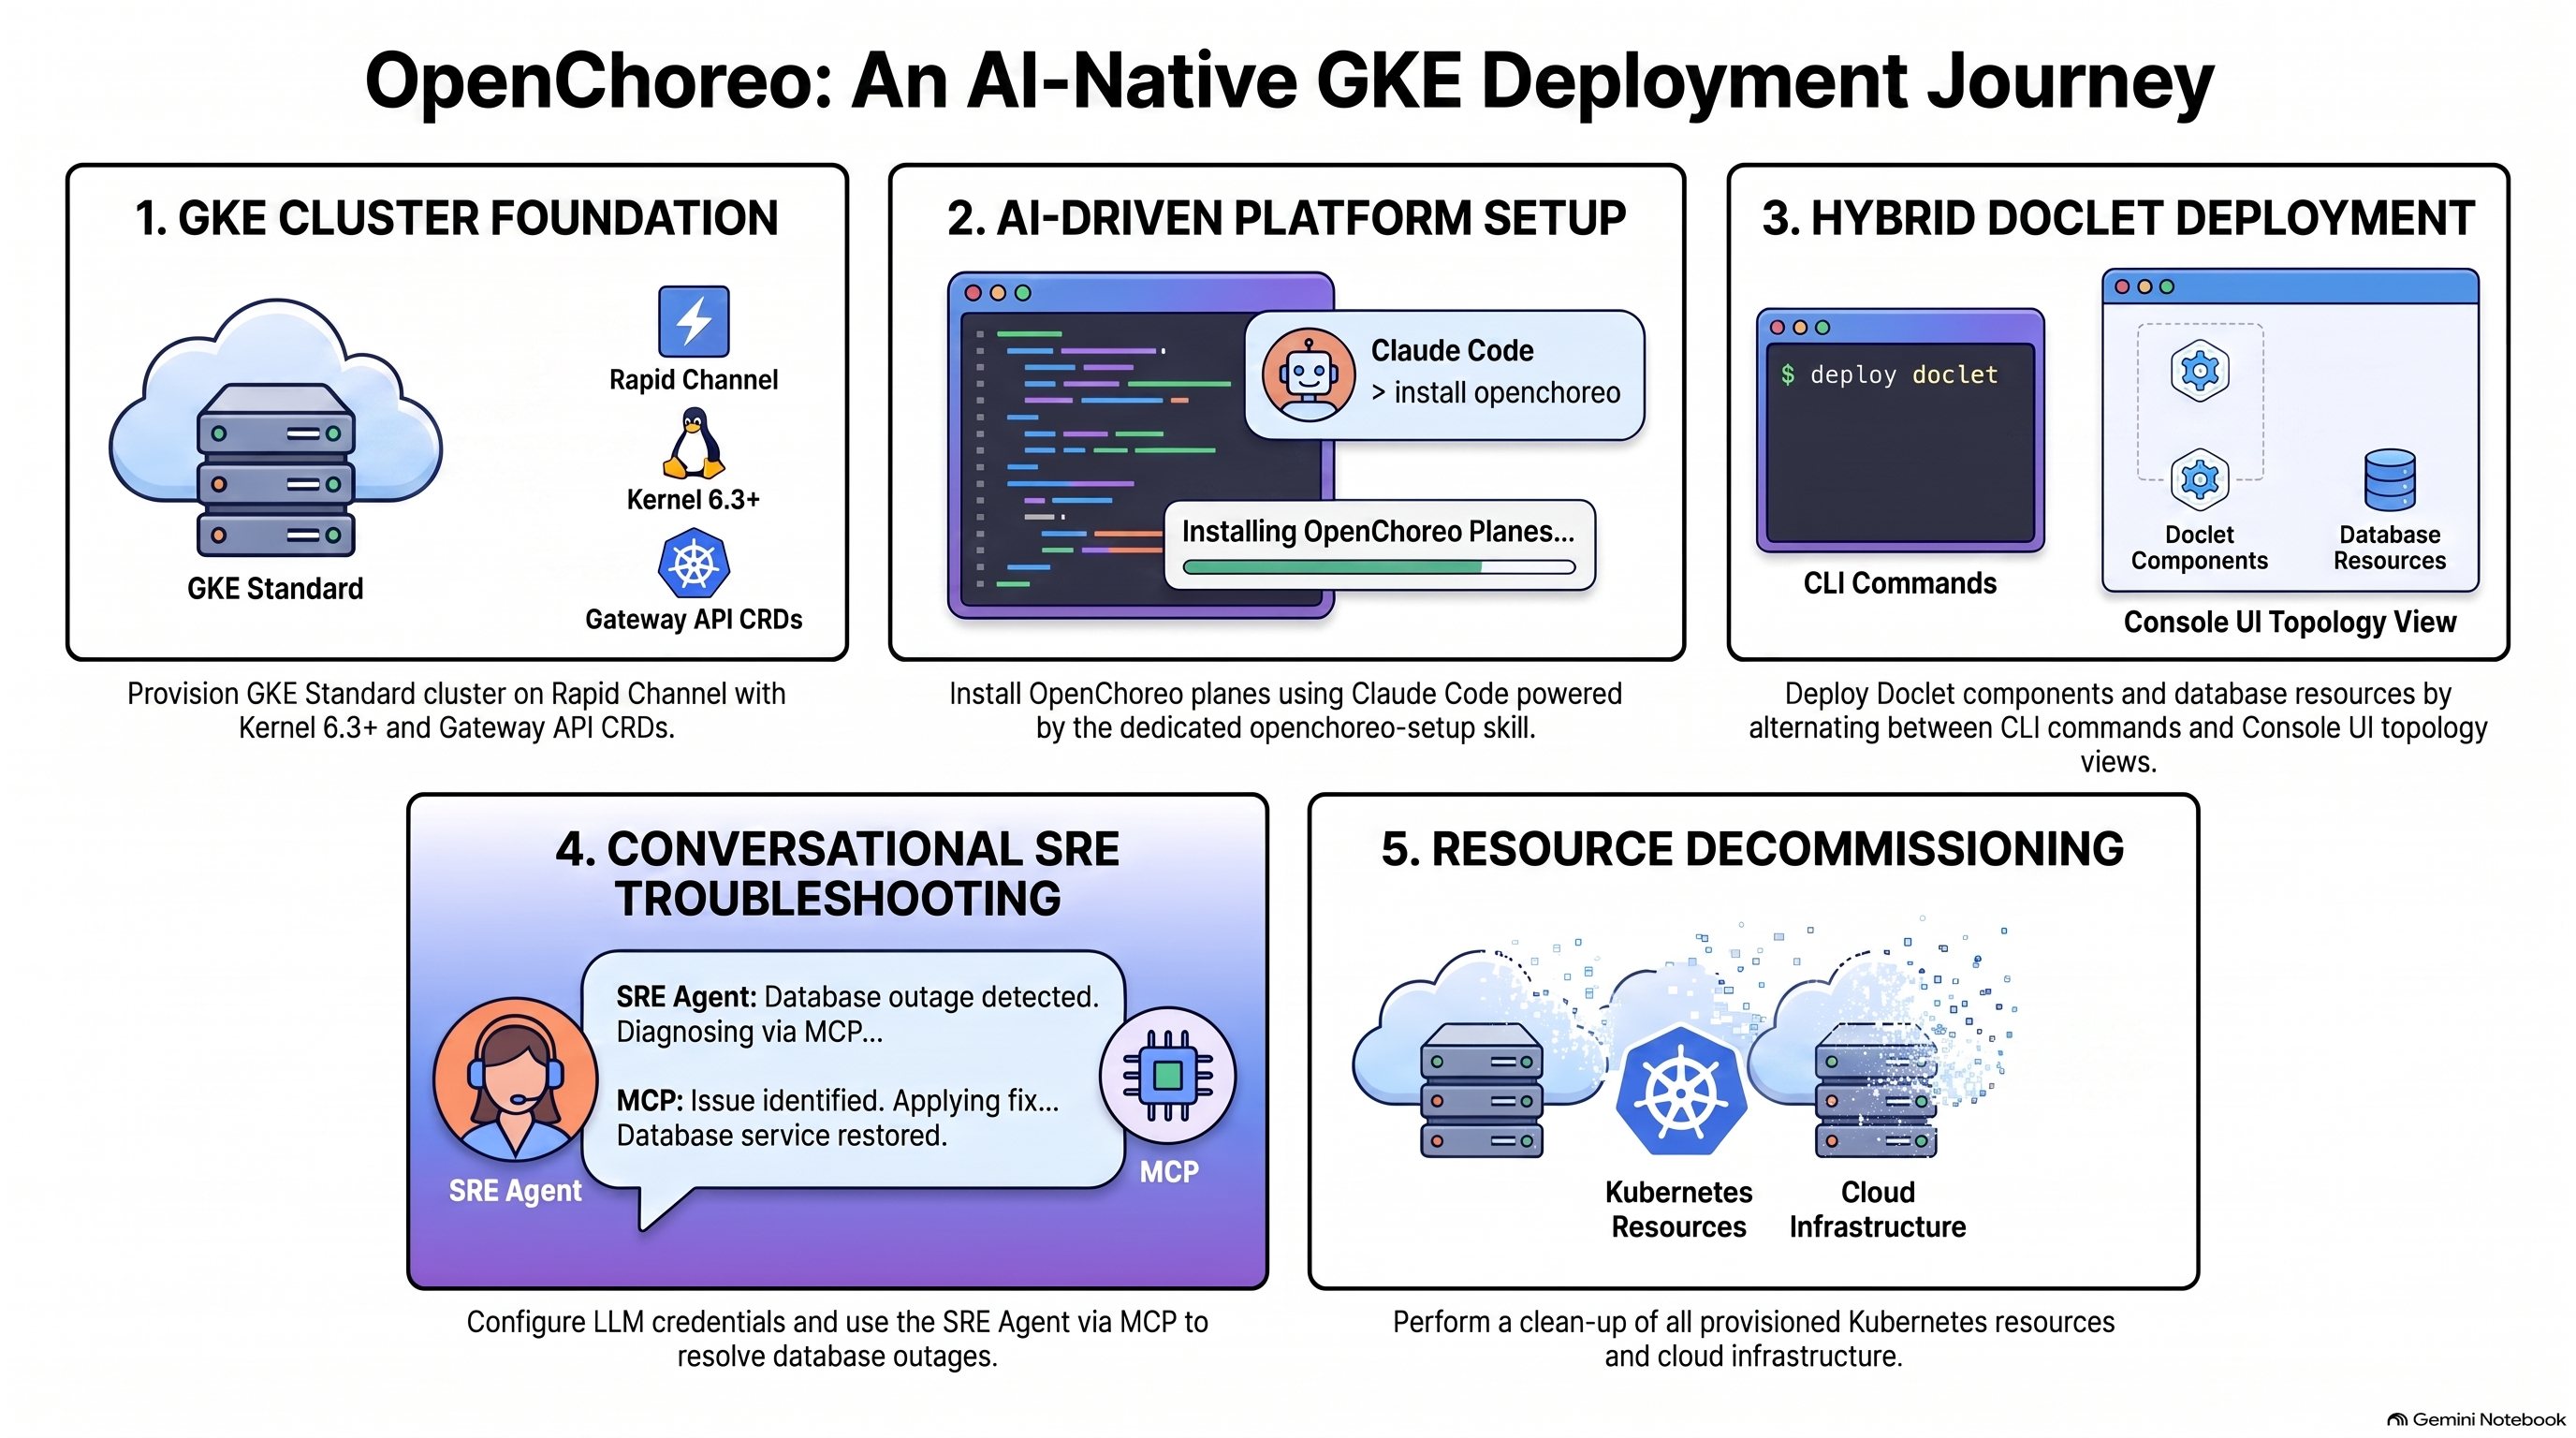
In my previous article, we explored the high-level, multi-plane architecture of OpenChoreo. We discussed how this CNCF Sandbox project acts as a complete, modular developer platform that augments Kubernetes rather than hiding it behind a black box.
Today, we are taking those concepts from theory to practice. We are going to deploy OpenChoreo to a Google Kubernetes Engine (GKE) cluster and run a microservices demo to see exactly how its Control, Data, and Observability planes operate in the real world and how the built-in SRE Agent can make debugging easier.
Why GKE Standard?
While GKE Autopilot offers a fully managed, hands-off experience, it enforces strict security boundaries that can cause compatibility issues with low-level platform setups. Specifically, GKE Standard is a superior fit for this deployment because:
- User Namespaces Support: OpenChoreo’s default build pipelines run container builds inside Argo Workflow pods that opt into Kubernetes user namespaces (hostUsers: false). This requires a modern node stack with Linux kernel 6.3+ and containerd 2.0+. GKE Standard lets us select the Rapid Release Channel to ensure our worker nodes meet these exact baselines.
- Infrastructure Control: Autopilot restricts custom mutating webhooks, certain low-level CRD adjustments, and raw host accesses. GKE Standard gives platform engineers unrestricted control to deploy OpenChoreo’s webhooks, gateways, and secret-handling controllers without hitting administrative blocks.
- Explicit Node Sizing: Running all four planes (Control, Data, Workflow, and Observability) requires substantial resources (including PostgreSQL, NATS, OpenSearch, Prometheus, and Argo Workflows). Sizing our nodes explicitly (e.g., e2-standard-4) prevents resource starvation during heavy builds.
Prerequisites
Before we start, you will need a few things set up:
- A Google Cloud Platform (GCP) account with billing enabled.
- The gcloud CLI installed and authenticated.
- kubectl installed for cluster interaction.
- (Optional but recommended) A basic understanding of Kubernetes native manifests, as OpenChoreo relies on Kubernetes as its underlying system of record.
Step 1: Spinning Up the GKE Standard Cluster
Let’s provision our GKE Standard cluster. To ensure our nodes meet the minimum kernel (6.3+) and runtime (containerd 2.0+) requirements for OpenChoreo’s Workflow Plane, we will create a cluster on GKE’s Rapid Channel.
Run the following command to spin up a 9-node cluster with e2-standard-4 machines (be sure to replace YOUR_PROJECT_ID with your actual GCP project ID):
export PROJECT_ID=<insert_your_project_id>
export REGION=us-central1
export CLUSTER_NAME=openchoreo-std-cluster
gcloud container clusters create $CLUSTER_NAME \
    --region $REGION \
    --num-nodes 3 \
    --machine-type e2-standard-4 \
    --release-channel rapid \
    --project $PROJECT_ID
Cluster creation will take a few minutes. Once it is up and running, configure kubectl to communicate with your new cluster:
gcloud container clusters get-credentials $CLUSTER_NAME \
    --region $REGION \
    --project $PROJECT_ID
Verify that you are connected by checking the cluster nodes. You should see 9 nodes in total (3 per region across 3 regions)
kubectl get nodes
Step 2: Installing the OpenChoreo Platform
OpenChoreo relies on standard Kubernetes building blocks (like the Gateway API, cert-manager, and kgateway) rather than proprietary black boxes.
Because OpenChoreo is built for the “Agentic Era,” you have two ways to install it: a manual, plane-by-plane Helm deployment, or a fully automated installation using an AI assistant like Claude Code, Cursor of Antigravity.
For this tutorial, we are going to showcase the AI-driven approach, as it perfectly highlights the platform’s native Model Context Protocol (MCP) integrations.
Install the OpenChoreo Setup Skill:
First, we need to give our local AI agent the ability to understand and deploy OpenChoreo’s multi-plane architecture. We will use the official skills. Run this in your terminal:
npx skills add openchoreo/skills --skill openchoreo-setup -g
Prompt the AI Agent:
Open your terminal with your preferred AI coding assistant (like Claude Code or Antigravity) and paste the following prompt. The agent will read your GKE cluster context and begin orchestrating the installation:
Install OpenChoreo on my Kubernetes environment on a single cluster at version next, with all four planes (control, data, workflow, and observability). Use the /openchoreo-setup skill. When it's done, summarize what was installed.
- Observability Plane CORS & OIDC Settings: When bootstrapping the Observability Plane (`openchoreo-observability-plane`), you must explicitly configure both the `security.oidc` parameters (to verify JWT tokens) and `observer.cors.allowedOrigins` (containing the Console URL). Without these settings, browser requests to fetch application logs/metrics will be blocked by CORS policy.
The prompt above instructs the AI Agent to deploy OpenChoreo with all control planes and summarise the installation. This typically prompts the Agent to write a walkthrought/summary doc which contains all links and instructions to use the tool. We also prompt the AI Agent to configure the components to trust each other’s self-signed certificates since that’s the default if you don’t use custom certificates. You can omit the last part if you plan to do a proper production-ready installation with public CA’s
I used Antigravity IDE, and it automatically handles provisioning the Gateway API CRDs, setting up the secret backend (OpenBao), handling TLS certificates, and configuring the Control and Data Planes via Helm.
Note: If you prefer the traditional infrastructure-as-code route, you can follow the official documentation to run the prerequisite kubectl apply and helm upgrade --install commands for each plane manually.
Wait a few moments for the OpenChoreo pods in the openchoreo-control-plane and openchoreo-data-plane namespaces to report a Running status. You now have a complete, AI-deployed IDP running on GKE
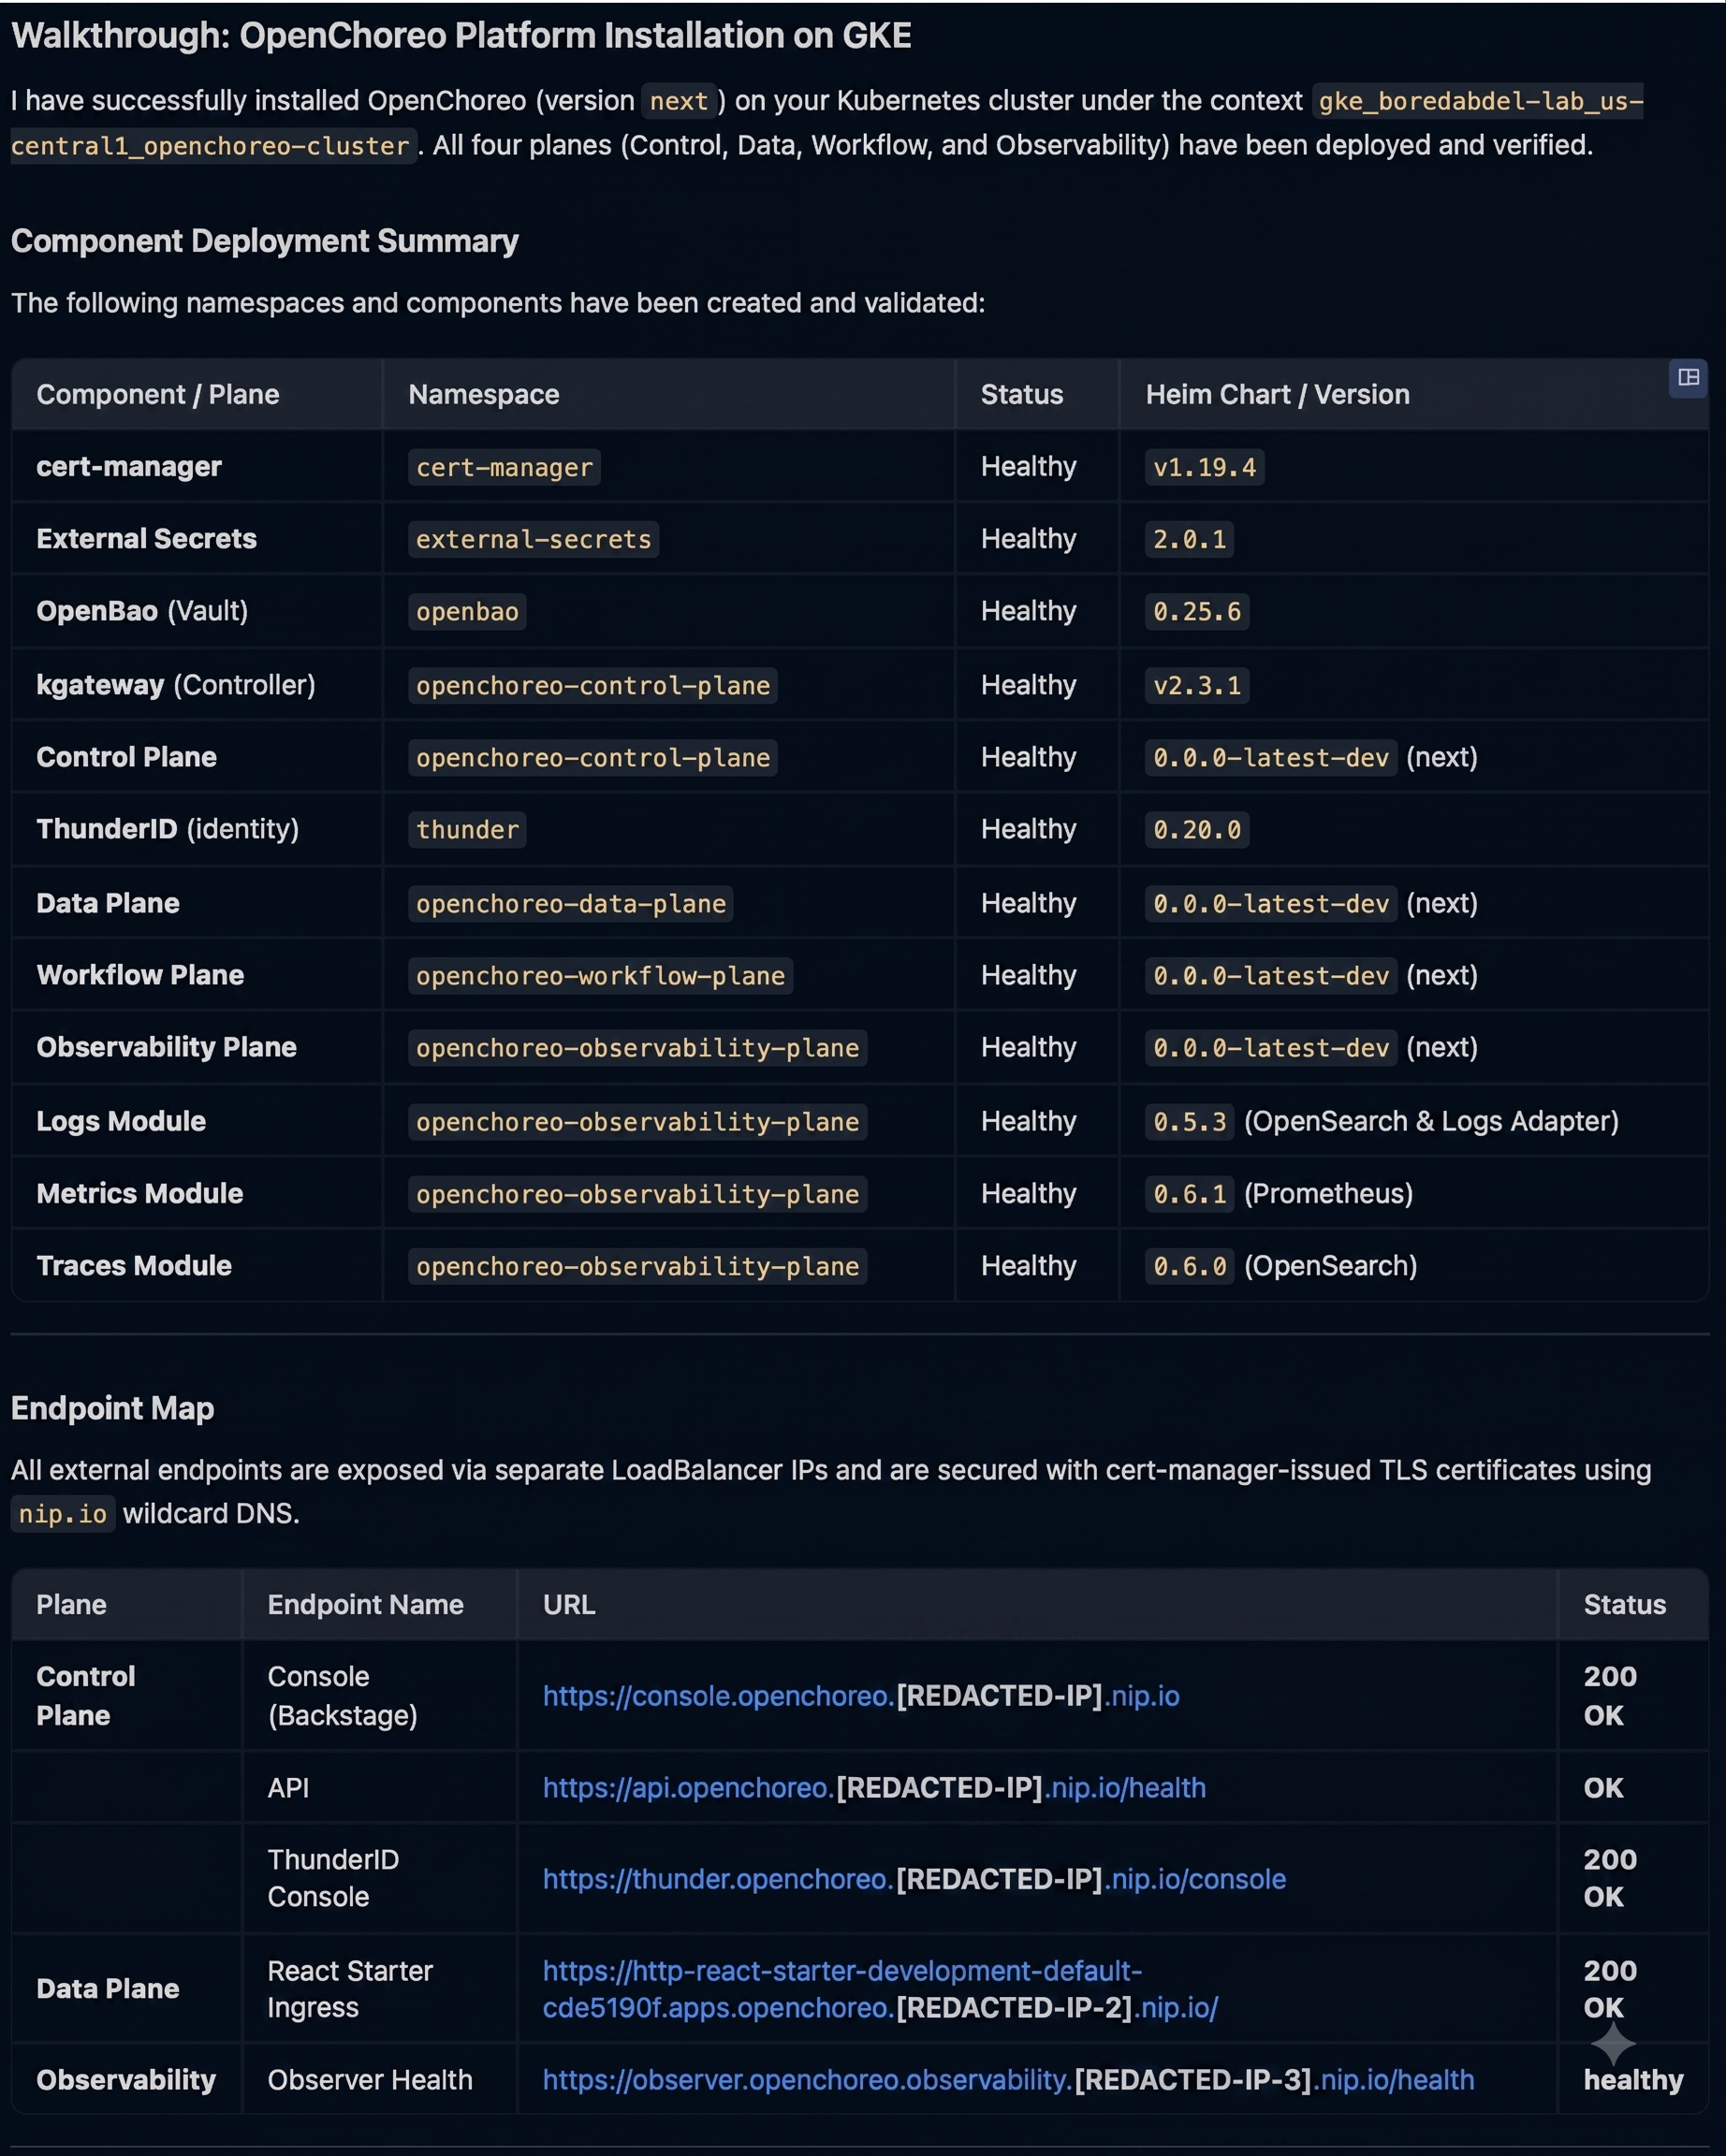
The screenshot below shows my installation using the Antigravity IDE. Antigravity generated a full walkthrough of the installation and every endpoint that was created. Note how the AI Assistant will automatically generate the DNS entries for the Console, API, ThunderID (OpenChoreo’s Identity provider)…
Step 3: Deploying the Microservices Demo (The Doclet App)
With our GKE cluster successfully running, let’s deploy the Doclet App of the official multi-service demo for OpenChoreo.
Unlike single-component applications, the Doclet App is a collaborative document editor that showcases how OpenChoreo manages service dependencies and automatically provisions managed cloud infrastructure using its Resource abstraction model.
Architectural Concept: Component vs. Resource
Before writing any deployment commands, it’s essential to understand how OpenChoreo conceptualizes your application architecture:
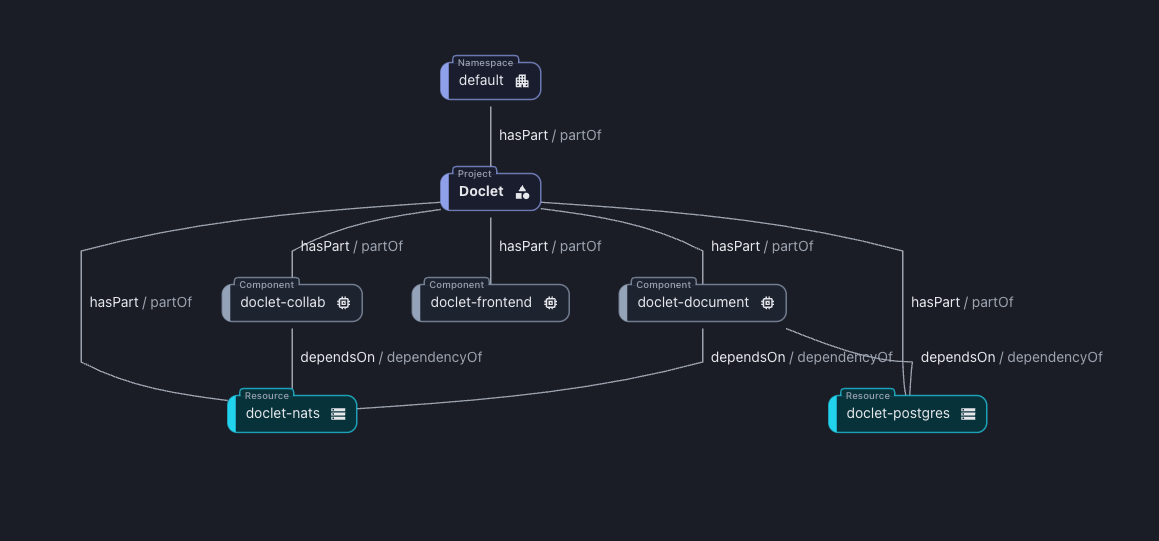
- Component: This represents your actual application code and deployable workloads. Components are the services, workers, cron jobs, or web frontends that you write, containerize, and deploy. For the Doclet App, we have three components:
- doclet-frontend: A React frontend served via Nginx.
- doclet-document: A Go-based REST API backend managing document state.
- doclet-collab: A Go-based WebSocket service enabling real-time collaboration.
- Resource: This represents the managed infrastructure backing services (like databases, messaging queues, or cache layers) that your components depend on to run. Instead of writing custom YAMLs for StatefulSets or operators, you declare a dependency on a Resource. The Control Plane automatically provisions the infrastructure and injects its secrets and credentials straight into your component container at runtime. The Doclet App relies on two resources:
- doclet-postgres: A PostgreSQL database instance.
- doclet-nats: A NATS messaging broker.
To demonstrate how developers and platform teams collaborate, this deployment alternates between Kubernetes CLI (kubectl) 💻 operations in the terminal and Developer Console (UI) 🌐 actions inside the Backstage-powered portal.
Declare the Project Workspace
💻 In your Terminal (CLI): Apply the project manifest to register the logical workspace boundaries on GKE:
kubectl apply -f https://raw.githubusercontent.com/openchoreo/openchoreo/main/samples/from-image/doclet/project.yaml
🌐 In the OpenChoreo Console (UI): Open your browser and navigate to the OpenChoreo Developer Portal. Log in using your developer credentials (make sure you use the developer credentials and not the admin ones; they should be in the form of admin@openchoreo.dev). Click on the Catalog tab. You will see that the new Doclet project has been instantly discovered, creating a team workspace.
Registering the Resources and Components
Now we will submit our declarative infrastructure requests (the database and message broker) along with our application components.
💻 In your Terminal (CLI): Apply the specs for your stateful services and your stateless microservices:
kubectl apply \
  -f https://raw.githubusercontent.com/openchoreo/openchoreo/main/samples/from-image/doclet/resources/postgres.yaml \
  -f https://raw.githubusercontent.com/openchoreo/openchoreo/main/samples/from-image/doclet/resources/nats.yaml \
  -f https://raw.githubusercontent.com/openchoreo/openchoreo/main/samples/from-image/doclet/components/service-document.yaml \
  -f https://raw.githubusercontent.com/openchoreo/openchoreo/main/samples/from-image/doclet/components/service-collab.yaml \
  -f https://raw.githubusercontent.com/openchoreo/openchoreo/main/samples/from-image/doclet/components/frontend.yaml
🌐 In the OpenChoreo Console (UI): Click into the doclet project in the Developer Portal and open the Diagram tab. OpenChoreo parses the underlying custom resources and dynamically renders your live application topology as an interactive graph. You will see the visual relationship map: doclet-frontend reverse-proxies API requests to the backends, while doclet-document maps a direct dependency line to the doclet-postgres database.
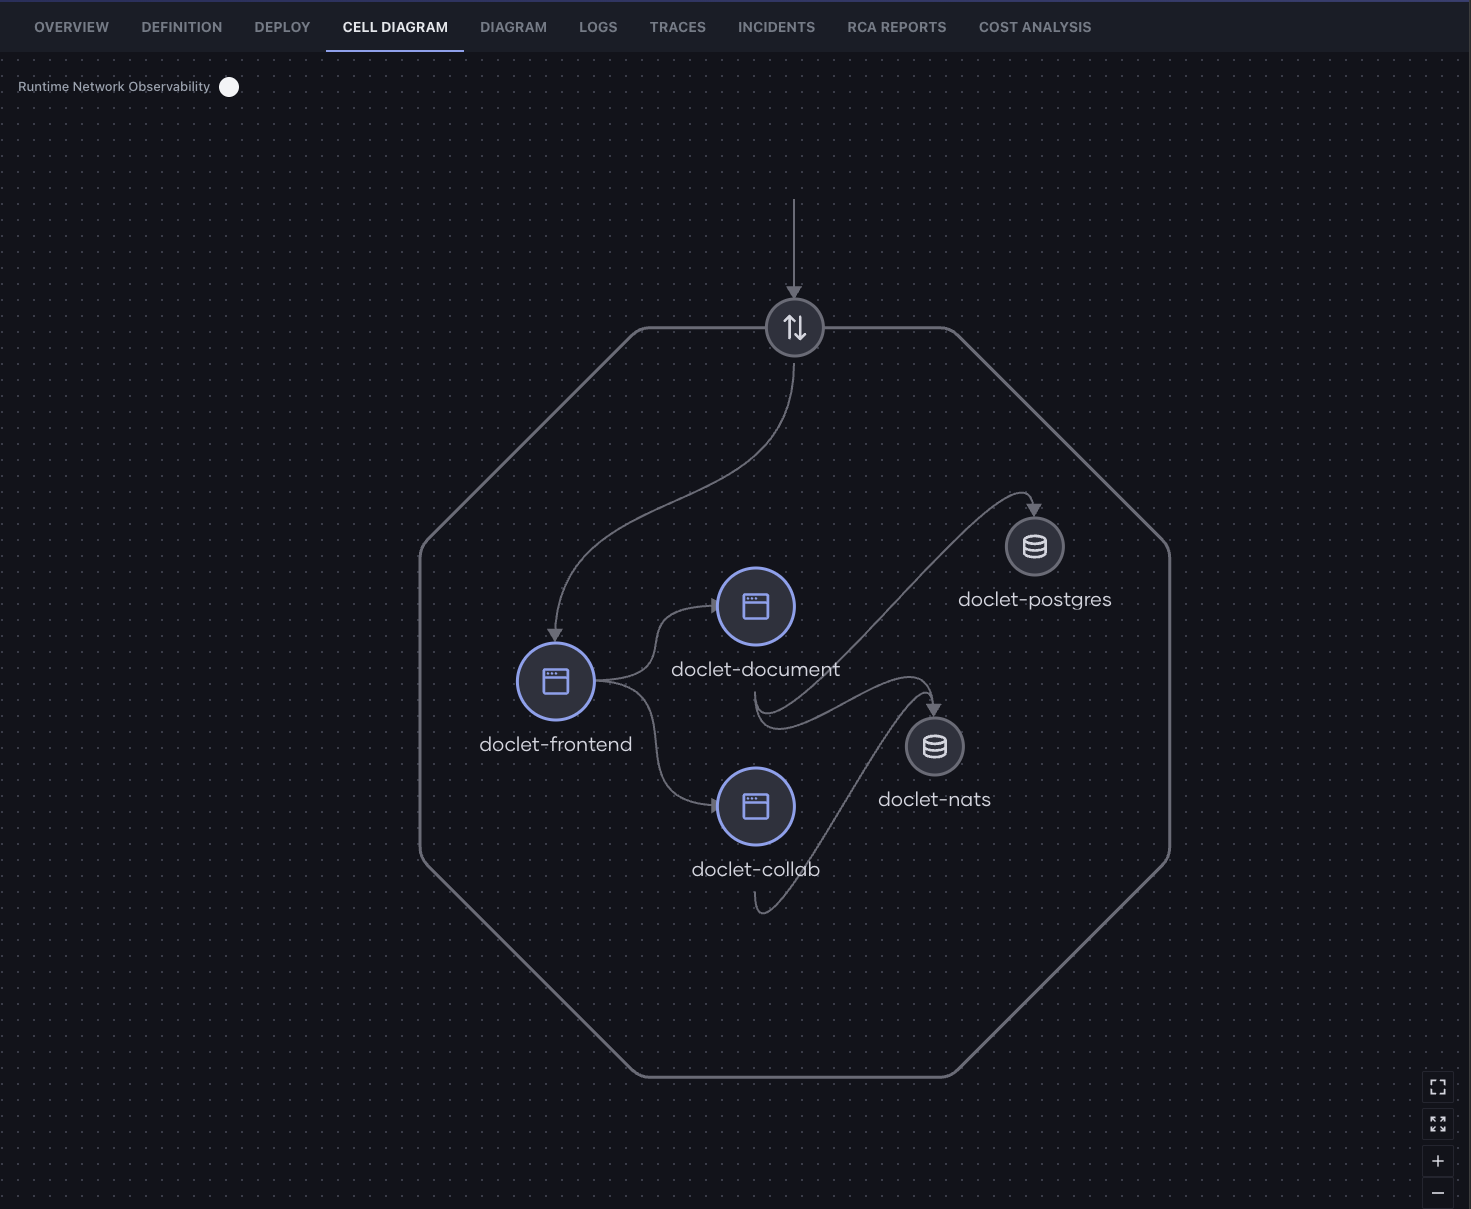
The Cell Diagram Tab shows how components are related to each other and which endpoints are project-level vs public (exposed via the gateway). In the data plane, the cell is implemented as a k8s namespace with network policies.
Binding and Environment Promotion
To keep deployments secure, OpenChoreo separates immutable resource definitions from active environment bindings, supporting a strict “one release, multiple environments” GitOps pattern.
Because the resources and components are declared, we must promote their bindings to the development environment to tell GKE to provision the actual pods and databases.
🌐 In the OpenChoreo Console (UI): Return to the Catalog Tab. Click on Doclet. You should see a list of components and resources.
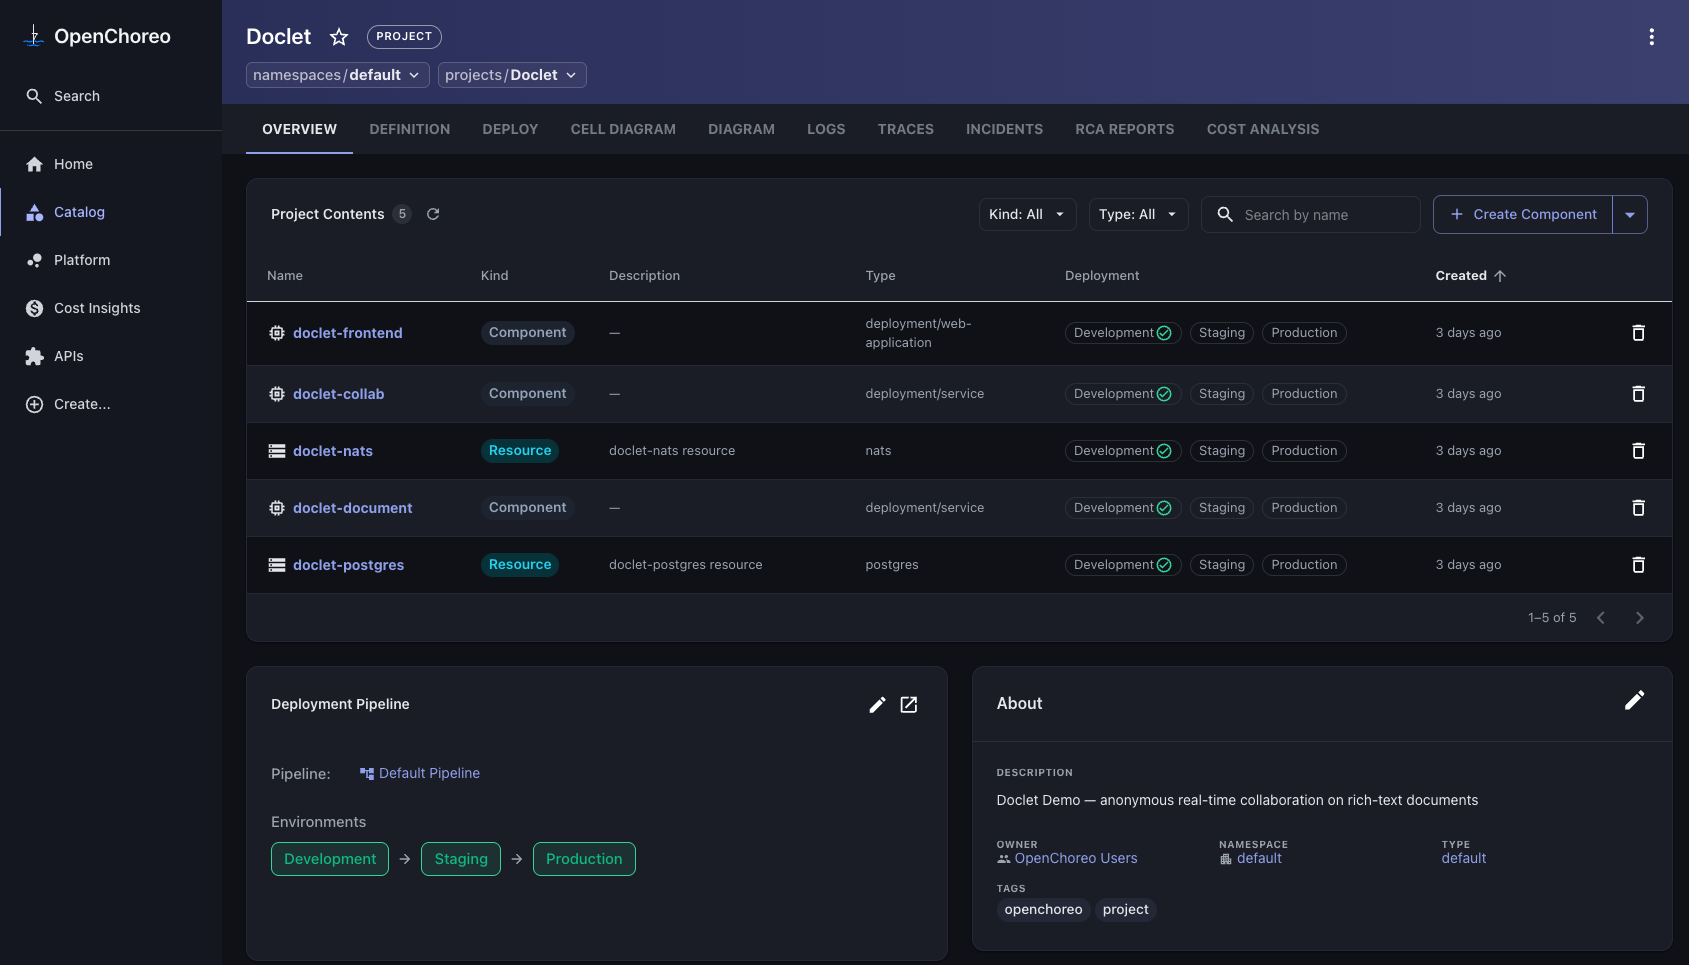
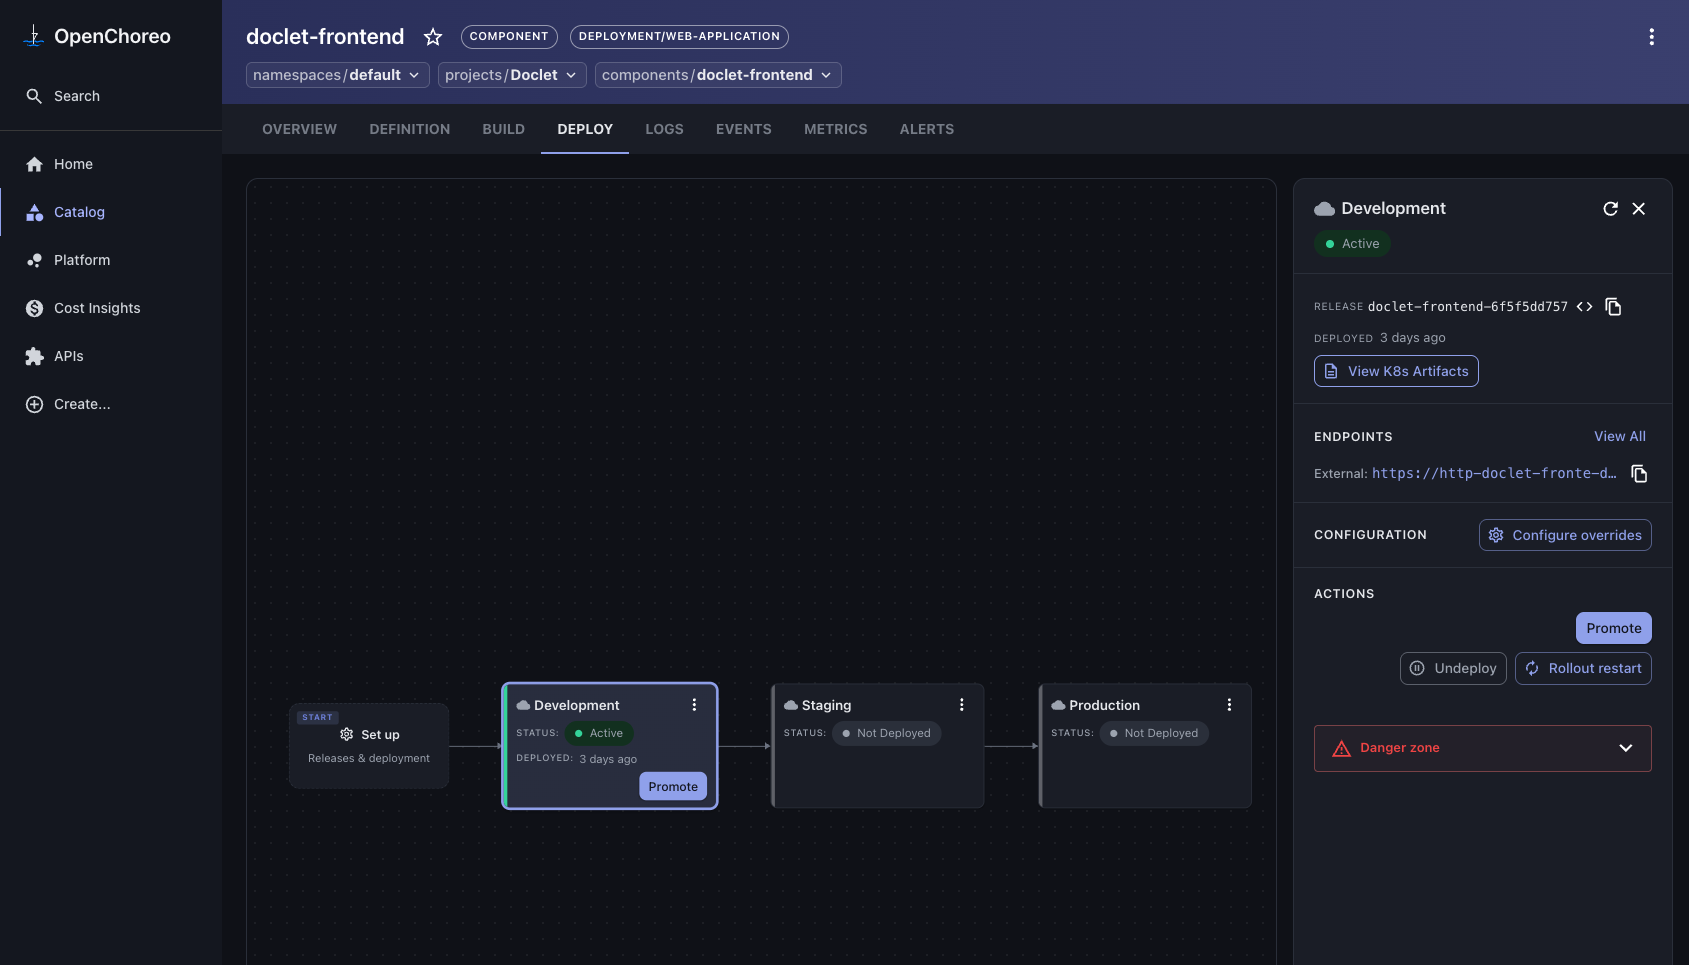
Start with the resources, click on doclet-nats, and in the Deploy tab, click on the setup button. Follow the instructions to trigger the deployment to the Dev environment. Repeat the same for the doclet-postgres resource. The frontend, collab, and document components should trigger deployments automatically because of OpenChoreo’s dependency management. Since we declared the resources as YAML files and specified the relations between them, the platform automatically understands that when resources are deployed, the apps depending on them should trigger a deployment as well.
Now, if you go back to the Catalog > Doclet page, you should see that all components and resources have been deployed to the Dev Stage.
Verifying and Accessing the Application
🌐 In the OpenChoreo Console (UI), go to Catalog > Doclet > doclet-frontend > Deploy tab and click the Open App external link button. The collaborative document editor will launch in your browser. You can create a document, open it in another tab, and watch edits synchronize in real-time over WebSockets.
Step 4: Showcasing AI-First SRE with the Model Context Protocol (MCP)
Many traditional internal developer platforms treat AI as an afterthought, usually a basic chatbot widget tacked onto a static dashboard. OpenChoreo, however, was designed from the ground up for the Agentic Era, treating human engineers and AI agents as equal first-class partners.
The platform’s Control Plane features native integration with the Model Context Protocol (MCP), an open standard that allows external AI assistants (like Claude Code, Antigravity, or Codex) to securely interact with the platform’s APIs under strict organizational guardrails.
However, in OpenChoreo’s lean, modular core configuration, the advanced SRE Agent (rca-agent) and Root Cause Analysis (RCA) Agent (which provide deep system analysis and autonomous diagnostic reasoning) are not installed by default. This ensures that you only pay the compute cost for advanced AI operations when your team actually needs them.
Here is how you can set up, install, and test this intelligent SRE troubleshooting workflow on your GKE Standard cluster:
Configuring LLM Access (Gemini / OpenAI API Key Setup)
Before deploying the SRE Agent, we need to provide it with access to our LLM provider of choice. The SRE agent can use any LLM via the OpenAI API, which is standard across multiple LLM providers. Before proceeding to the next step, make sure you have your LLM provider API Key ready. We will prompt our AI assistant to store it as a secret for us.
Prompting Your AI Assistant to Install the SRE & RCA Agents
Similar to how we installed the platform, we can simply ask our local AI agent to deploy these agentic capabilities for us.
Open your terminal with your preferred AI coding assistant and execute the following prompt:
Deploy and enable the OpenChoreo Portal Assistant and SRE Agent modules on my current GKE Standard cluster. Ensure the rca-agent ServiceAccount is created and bound with the necessary RBAC roles to access the Observability and Control Plane APIs.
Assume an LLM API Key will be provided for you. Ask for it and I will pass it along so you can store it in the platform Secret Store OpenBao. Configure the agent to use openai:gpt-4o-mini
Behind the scenes, your AI assistant will analyze the cluster state, apply the required platform manifests, and automatically configure the internal cluster roles and permissions (including backstage-catalog-reader, rca-agent, and observer-resource-reader). Within moments, the Portal and SRE Agents should be running securely alongside your control plane. It should also pause and ask you to pass along the key. This will only be stored in the AI Assistant Memory and not persisted into any filesystem.
Simulating an Application Failure
Now, let’s intentionally break our backend document service to simulate a typical late-night SRE issue. Since OpenChoreo runs a continuous reconciliation process from Git, the typical ways of breaking configs to simulate an incident will not work.
We will scale down the Postgres StatefulSet to intentionally break the document service. Query the StatefulSets and pods in the dev namespace and look for the postgres pod by running the following:
kubectl get pod -n dp-default-doclet-developement-xxx
kubectl get statefulset -n dp-default-doclet-developement-xxx
Then scale down the StatefulSet to cause an incident
kubectl scale statefulsets STATEFULSET_NAME --replicas=0 -n dp-default-doclet-developement-xxx
After scaling the postgres database down, the built-in Prometheus detects that and fires up an Alert on AlertManager. This will post an API Call to the SRE Agent inside the Observability namespace to trigger an analysis. Wait a few minutes and check the Doclet project in the console. In the RCA Reports tab, you should see a report being generated.
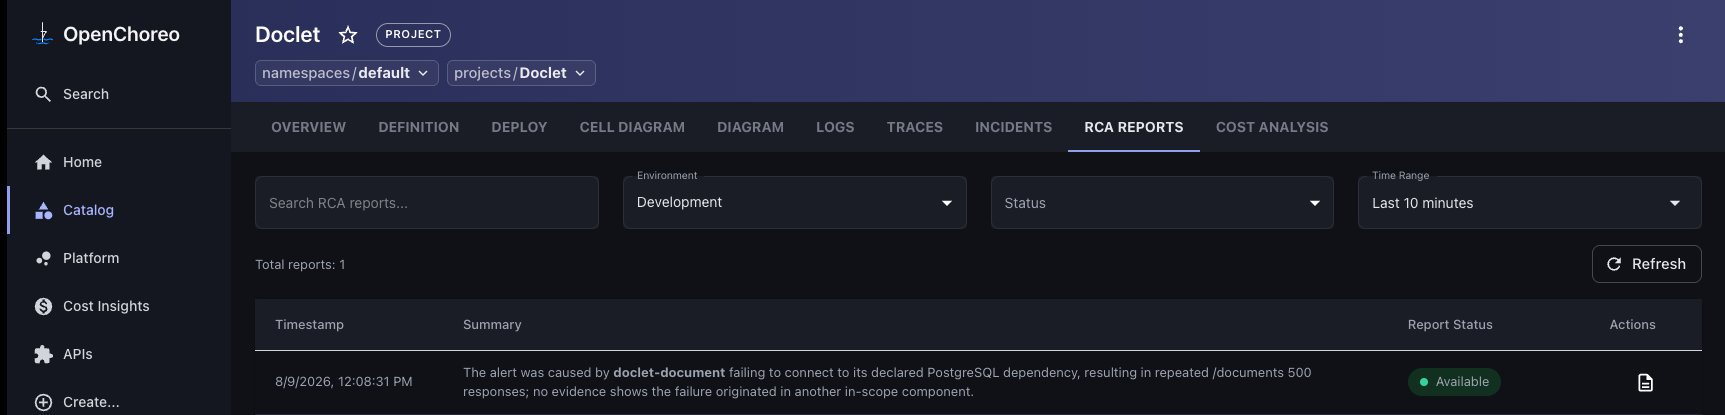
When the report is available, you should have a full analysis of the root cause of the error, along with proposed fixes, a timeline, and likely and unlikely related errors. You can either read the full RCA or click on the portal assistant (Bubble button on the bottom right corner) to chat further with the AI assistant.
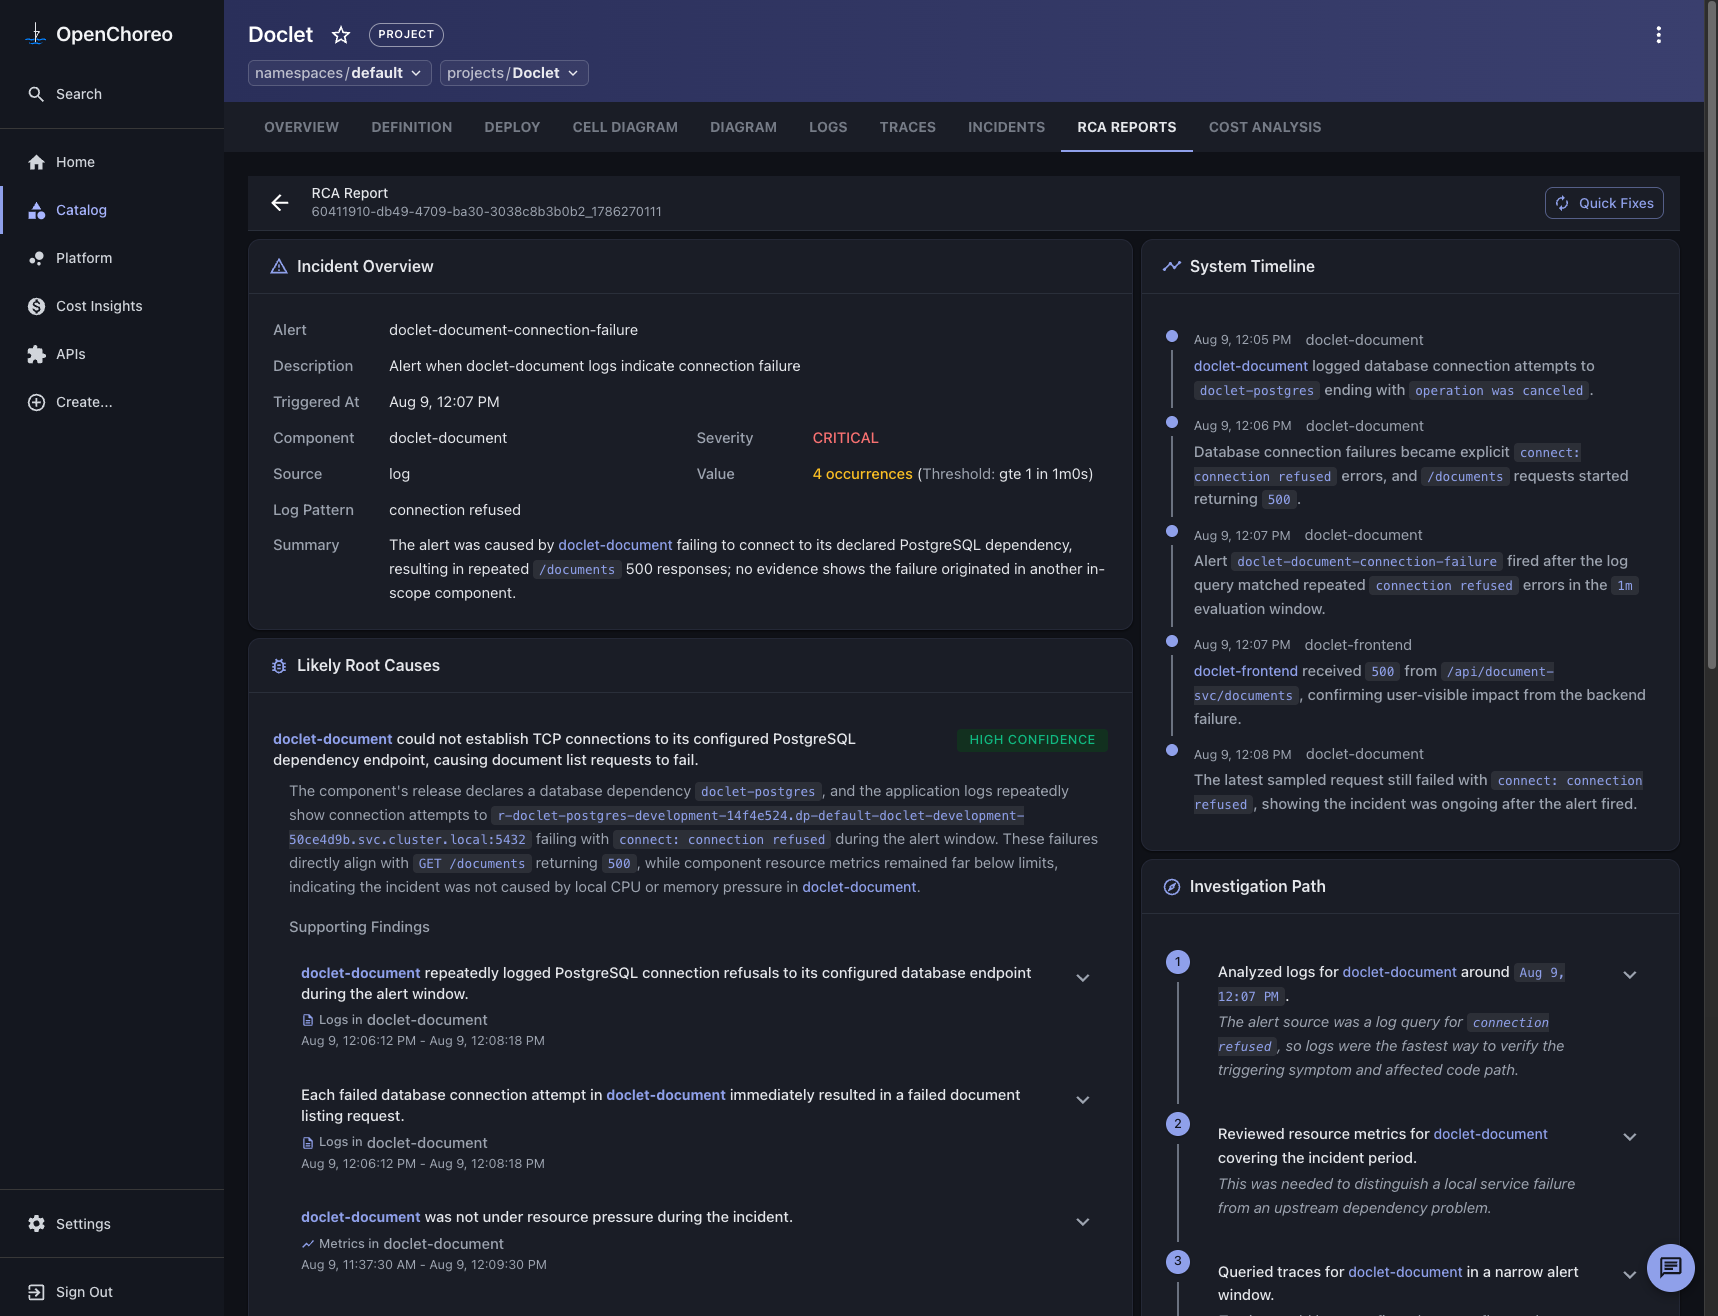
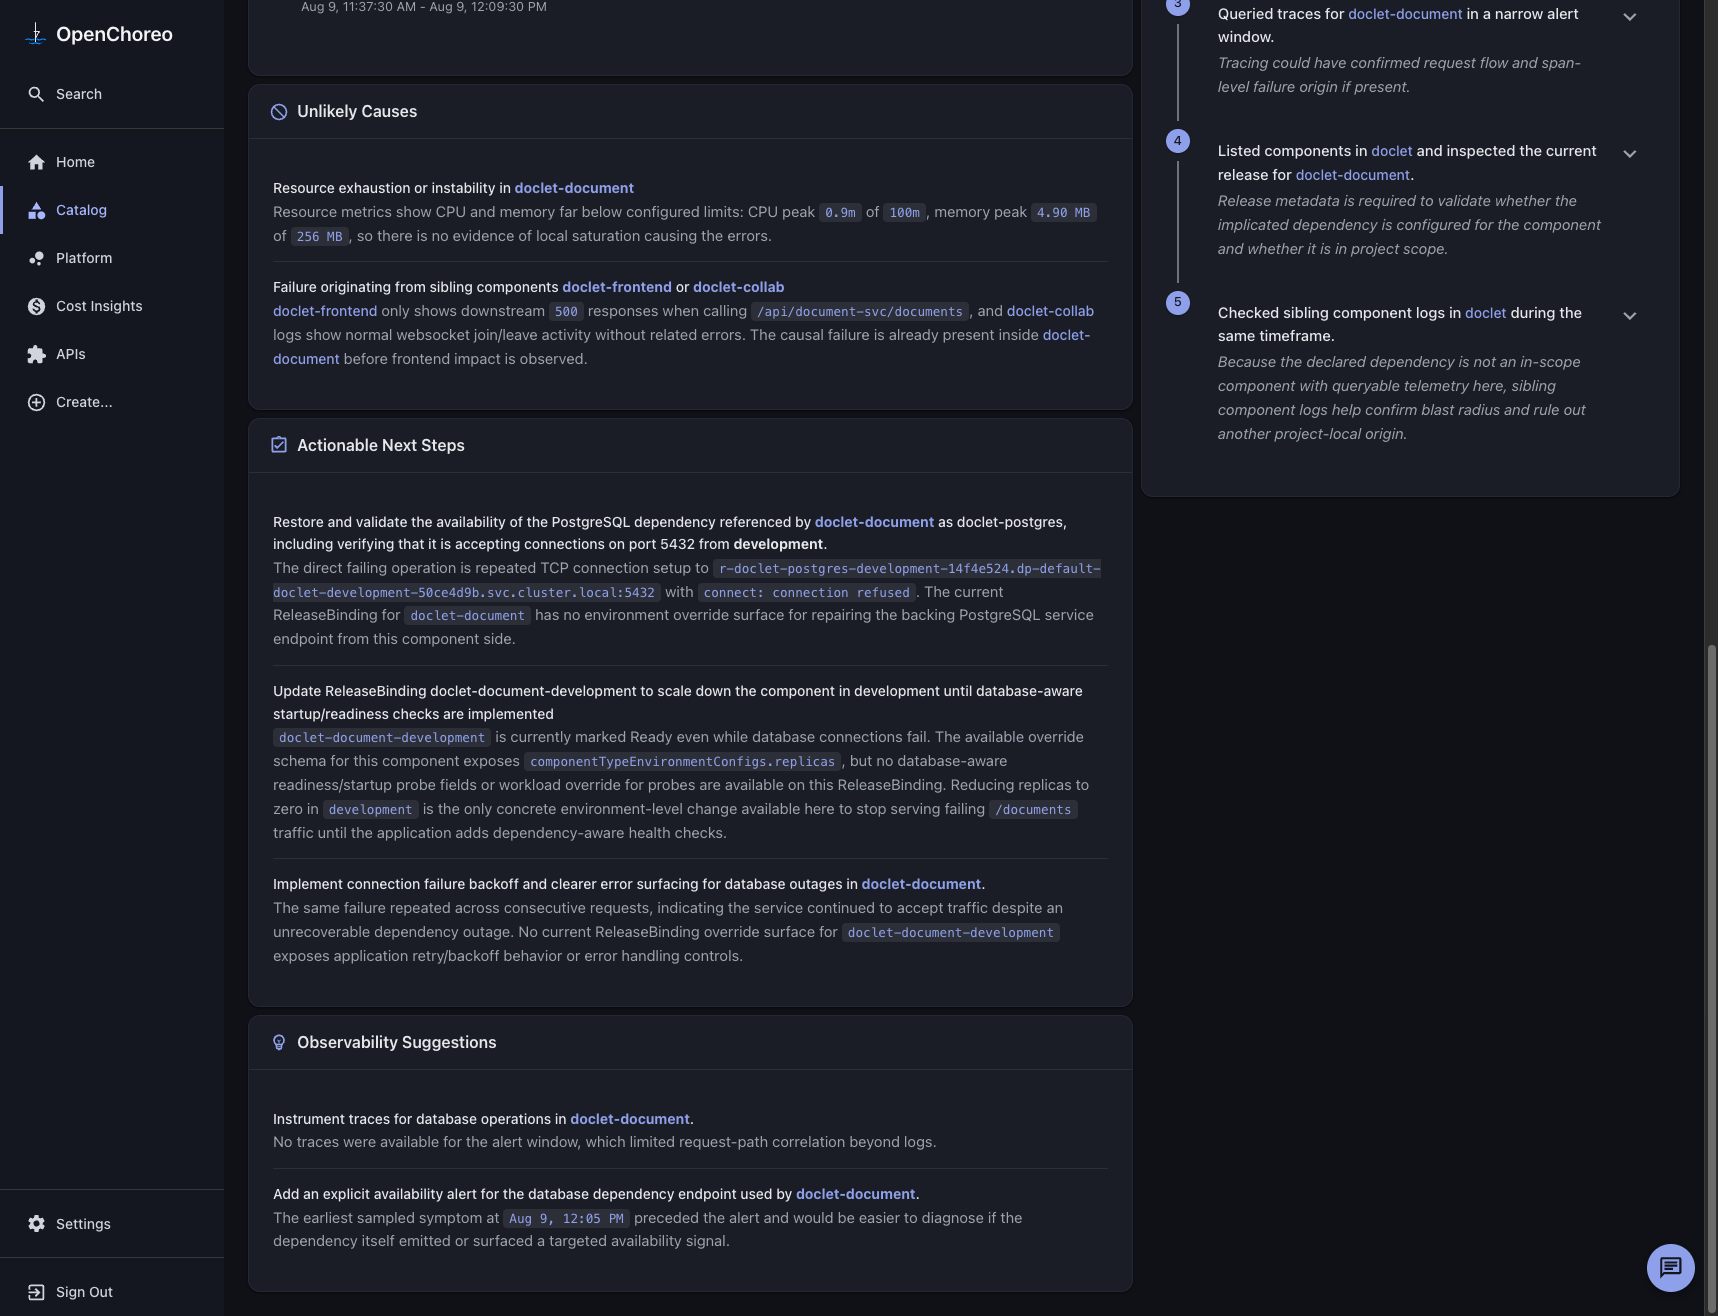
Now that we know what caused the issue, we can scale back up the database and wait for the RCA to clear.
kubectl scale statefulsets STATEFULSET_NAME --replicas=1 -n dp-default-doclet-developement-xxx
Conclusion: The Future of Platform Engineering is Agentic
Deploying a modern Internal Developer Platform (IDP) on Google Kubernetes Engine doesn’t have to mean building a brittle, custom-coded “black box” that obscures the very infrastructure it’s meant to orchestrate. By leveraging GKE Standard alongside OpenChoreo’s multi-plane architecture, platform engineers can maintain full operational control while giving development teams a clean, self-service golden path.
Through this hands-on guide, we have seen how:
- Infrastructure Control and Node Autonomy on GKE Standard allow us to leverage modern node features like User Namespaces to run secure, unprivileged container builds.
- Components and Resources provide a robust abstraction model, separating application code from managed stateful backends (like Postgres and NATS) without hardcoding credentials or configurations.
- The Dual-Perspective Interface allows developers to choose how they work. They can deploy declaratively through standard kubectl CLI commands or manage services visually through the Backstage-powered Developer Console.
- AI-First Operations can be integrated natively via the Model Context Protocol (MCP), enabling on-demand, conversational SRE diagnostics that analyze metrics, logs, and traces to provide instant root-cause analysis.
By treating AI agents as first-class citizens alongside human operators, OpenChoreo represents a paradigm shift. The platform of tomorrow isn’t just about automated developer self-service; it is agentic.
Ready to build the future of platform operations? Head over to openchoreo.dev to explore the official documentation, browse the modules catalog to integrate your existing enterprise toolchain, and drop a star on the official OpenChoreo GitHub repository to support the community